Refactoring Exercise 2: The photoelectric effect cross section

Advanced Programming Concepts 2014

23-27 June 2014
MPI Munich, Germany
School web site

Refactoring session web page


Rationale

This exercise deals with the calculation of the photoelectric cross section in Geant4 standard electromagnetic package. This is a real-life refactoring example: the exercise proposed at the APC 2014 school is a simplified version of the refactoring actually done in an ongoing project of Geant4 physics validation. The full set of validation results enabled by the refactoring will be documented in a forthcoming journal publication.

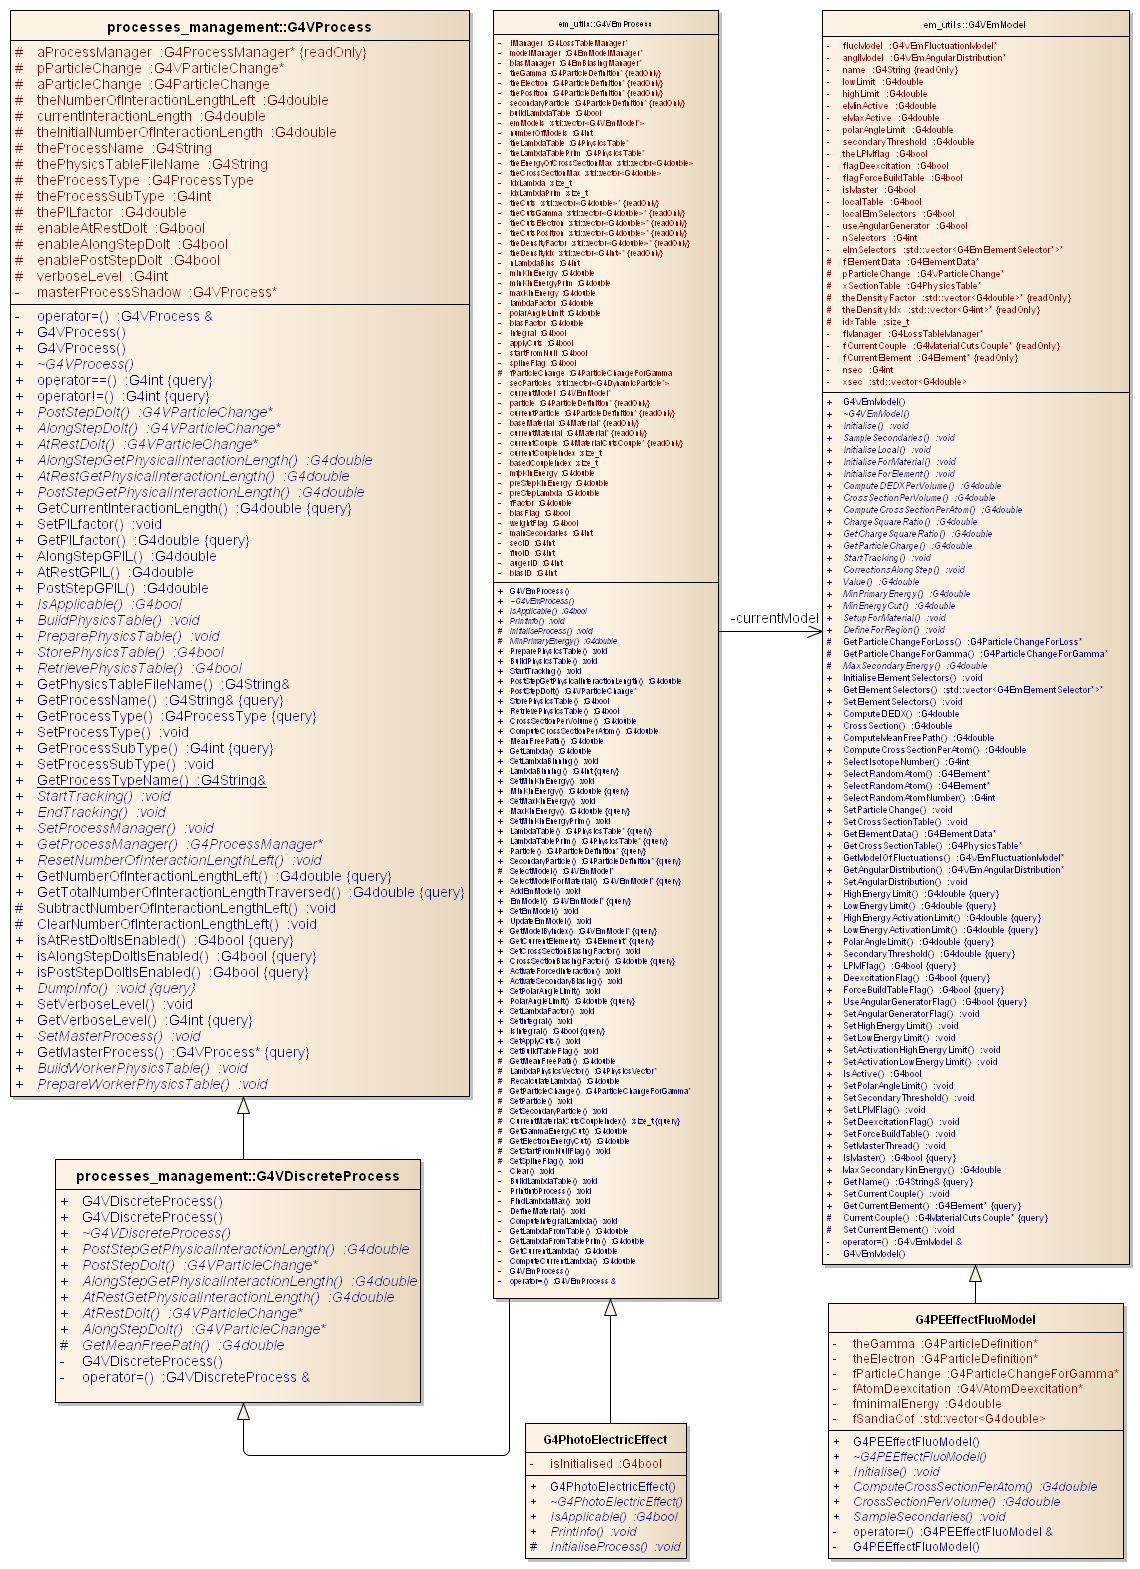
In the software design of Geant4 10.0-patch01 (the latst Geant4 version at the time of the APC 2014 school) the photoelectric effect is handled by the G4PhotoElectricEffect class, which inherits from the G4VEMProcess class, which in turn inherits from G4VDiscreteProcess, which in turn inherits from the G4VProcess. Geant4 particle transport kernel only knows about G4VProcess. A G4VEMProcess can be configured with one or more models, each one inheriting from G4VEMModel. The G4PEEffectFluoModel inherits from G4VEMModel; it is one of the models of the photoelectric effect available in Geant4.

photoelectricEffect.png

The photoelectric cross section of Geant4 standard electromagnetic package is based on an empirical formula reported in F. Biggs and R. Lighthill, Analytical Approximations for X-Ray CrossSections III, Sandia Report SAND87-0070, 1988:


E is the photon energy, Aij are empirical parameters for the photoelectric cross section in interval j of element i, i=1,...,100 and j=1,...,mi, where mi is the number of fitting intervals used for element i. The original Aij parameters are tabulated in the SAND87-0070 report. The photoelectric cross section calculation implemented in Geant4 uses "improved" Aij parameters for some elements and intervals.

We would like to validate the total cross sections used by G4PEEffectFluoModel, i.e. to compare them with experimental cross section measurements we have collected from the literature.

Overview of the exercise

  1. Set up a CernVM virtual machine
  2. Download the tarball with the material for the exercise
  3. Test the photoelectric cross section calculated by G4PEEffectFluoModel
  4. Refactoring: Extract class
  5. Test the refactored class to produce consistent results
  6. Add functionality: the ability to calculate photoelectric cross sections both with original and improved Aij parameters
  7. Test the class
  8. Compare with experimental data: let the new class produce cross sections in the same configuration (Z,E) as experimental data, both with original and improved Aij parameters
  9. Plot experimental data and produced cross sections
  10. Discussion

Getting started

This exercise uses a simple Geant4 development setup, which is different from the typical Geant4 user setup. The refactoring exercise is shielded as much as possible from the complexity of Geant4: that is, the students do not need to be familiar with Geant4 to do the exercise.

Setting up a CernVM virtual machine on your laptop

The exercise requires a Scientific Linux 6 platform.

red77.gif Install a hypervisor on your laptop. The following procedure has been tested on VirtualBox, but in principle it should work with any other hypervisor.

red77.gif Follow the instructions to configure your hypervisor.

red77.gif Configure your CernVM virtual machine. You may want to share a folder on your laptop devoted to refactoring exercises.

red77.gif If you did not yet define a suitable context (a set of configuration options), create a new one.
   We will not use CVMFS, therefore you do not need to configure the corresponding options.
   Define yourself as a user. Select a tcsh shell to facilitate the setup of the environment for the exercise documented below.
   In Setting up CernVM Preferences, select the Desktop option (don't forget to tick Start X on startup).

red77.gif Pair your virtual machine to the context that you defined.

red77.gif Login on your virtual machine.

Download the tarball for the exercise

red77.gif You can download it or you can wget http://www.ge.infn.it/geant4/training/APC2014/exercise2/APC2014ex2.tgz

red77.gif Unpack the tarball in your home directory: tar -zxf APC2014ex2.tgz

Now you have an APC2014ex2 directory on your virtual machine, which contains all what you need for the exercise:

geant4.10.00.p01
contains Geant4 code, version 10.0-patch01
work10APC contains Geant4 libraries (precompiled on SL6 with gcc 4.4.7) and the test executables you will create in the exercise
parametersAPC contains "original" and "improved" Aij parameters for the calculation of photoelectric cross sections
dataAPC contains experimental data for validation; you will place the cross sections calculated by the test here
test contains the test code to be used in the refactoring process
rwork contains R scripts for data analysis
setup10APC.csh
setup10APC.sh
defines some environmental variables needed for the test

Defining some environment variables

In your home directory:

source setup10APC.csh
(or the equivalent setup10.sh, depending on the Unix shell you prefer)
You should get the message: You are working on a Linux-g++ system at the end of the setup.

You may notice that some environment variables defined in setup10APC.csh are commented out: these are environment variables corresponding to Geant4 data files, which are not needed by this exercise. If you wish to have a full Geant4 working environment, you should download the Geant4 data files and define the associated environment variables according to the path where you placed them.

The setup10APC script defines a convenient environment variable corresponding to the directory containing the meterial for the exercise:

setenv APCDIR $HOME/APC2014ex2

Place new tests in $APCDIR/test. The following instructions assume you are using the tcsh shell; adapt them as appropriate, if you use the Bourne shell.

To compile and link a test:

setenv TESTTARGET name_of_the_test_to_be_built_without_.cc (e.g. setenv TESTTARGET G4PEEffectFluoTest)
gmake

If you wish to rebuild a test from scratch:
cd $APCDIR/test
setenv TESTTARGET name_of_the_test_to_be_built_without_.cc
gmake clean
gmake

Testing total cross sections calculated by G4PEEffectFluoModel

You can find the photoelectric cross section G4PEEffectFluoModel class in $G4INSTALL/source/processes/electromagnetic/standard/include (G4PEEffectFluoModel.hh header file ) and $G4INSTALL/source/processes/electromagnetic/standard/src/ (G4PEEffectFluoModel.cc implementation). G4PEEffectFluoModel has a ComputeCrossSsectionPerAtom public member function, which returns the total photoelectric cross section for a given element corresponding to a given photon energy:

G4double ComputeCrossSectionPerAtom(const G4ParticleDefinition*,
                                    G4double kinEnergy,
                                    G4double Z,
                                    G4double A,
                                    G4double, G4double)

This is what we need indeed!

We create a simple unit test G4PEEffectFluoModelTest.cc, which instantiates a G4PEEffectFluoModel object and invokes ComputeCrossSectionPerAtom in pre-defined configurations of photon energy and target element. We place the unit test in $APCDIR/test.

We build the test:

cd $APCDIR/test
setenv TESTTARGET G4PEEffectFluoModelTest
gmake

Then we run the test:

$G4WORKDIR/bin/Linux-g++/G4PEEffectFluoModelTest


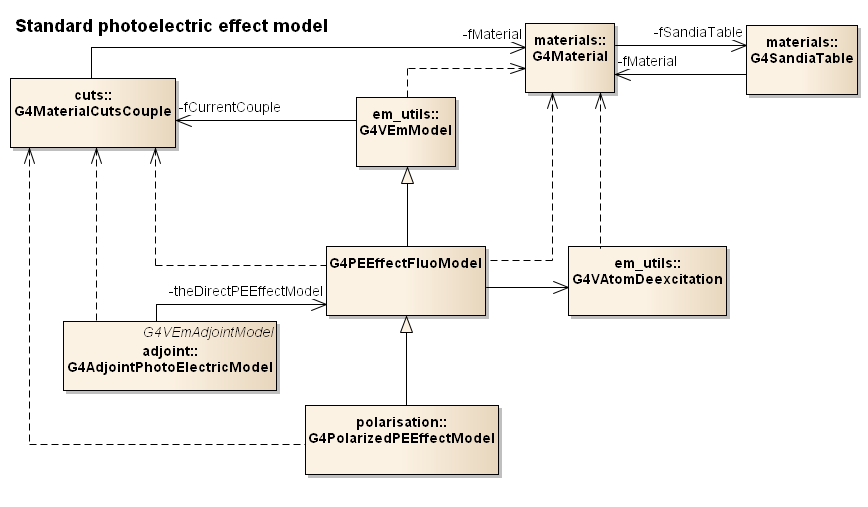
By looking into G4PEEffectFluoModel, we realize that there are hidden dependencies that prevent the calculation of the total cross section in a simple unit test as the one we wrote. Some of the dependencies are illustrated in the UML class diagram below. To be able to calculate a total cross section for a given element, we should instantiate a series of classes, including a material (not an element) object, a secondary production threshold object etc.

photoelectric-std.png

We could investigate the use of some of the techniques described in the book "Working Effectively with Legacy Code" to make the calculation of the photoelectric cross section testable.

As physicists, we perceive a "bad smell": we want to be able to know the cross sections used in our simulation and to compare them with experimental data without creating unnecessary objects that have no relation with a cross section.

 We decide to refactor (reengineer) the code and make the photoelectric cross section testable.

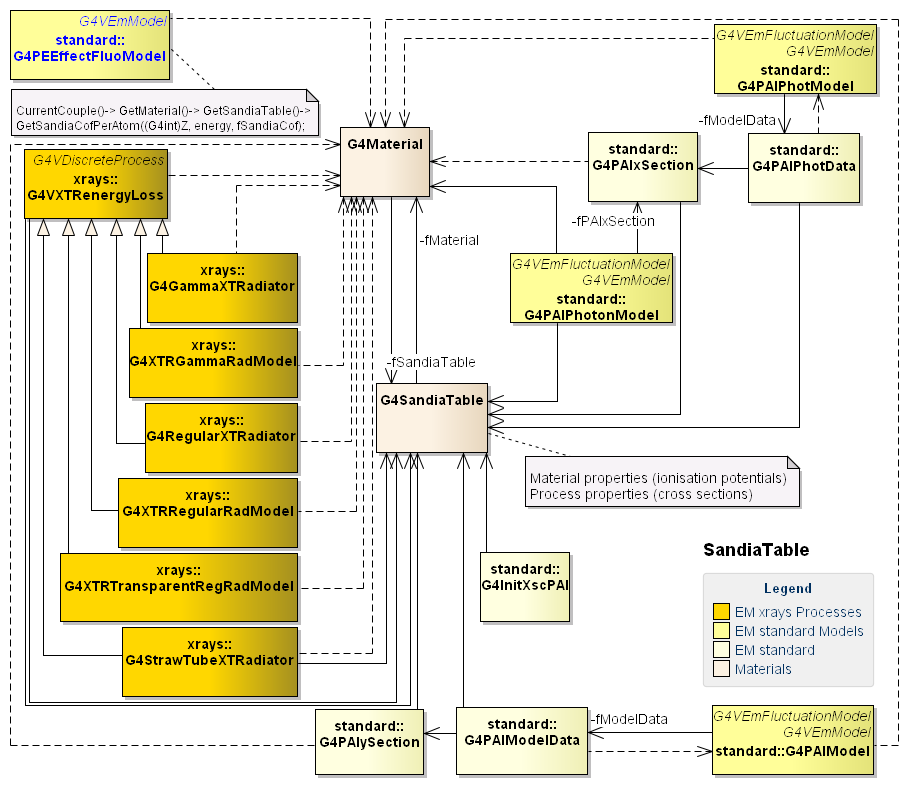
We observe in the UML class diagram below that the G4SandiaTable has too many and confused responsibilities: it is responsible for properties of an element (e.g. the ionisation energy, AKA ionisation potential), for features pertinent to a specific photon interaction process (atomic photoelectric cross sections) and for features pertinent to a process realization in matter at tracking time (e.g. macroscopic photoelectric cross sections in a material). We want to split responsibilities. In this exercise we focus on the photoelectric cross section.

sandia.png

Refactoring Biggs-Lighthill photoelectric cross section

We identify a few smells:
We apply Extract Class. We create a new G4CsPhotoelectricAPC class and move the relevant fields and methods from the old G4SandiaTable, G4StaticSandiaData and G4PEEffectFluoModel classes into the new class.

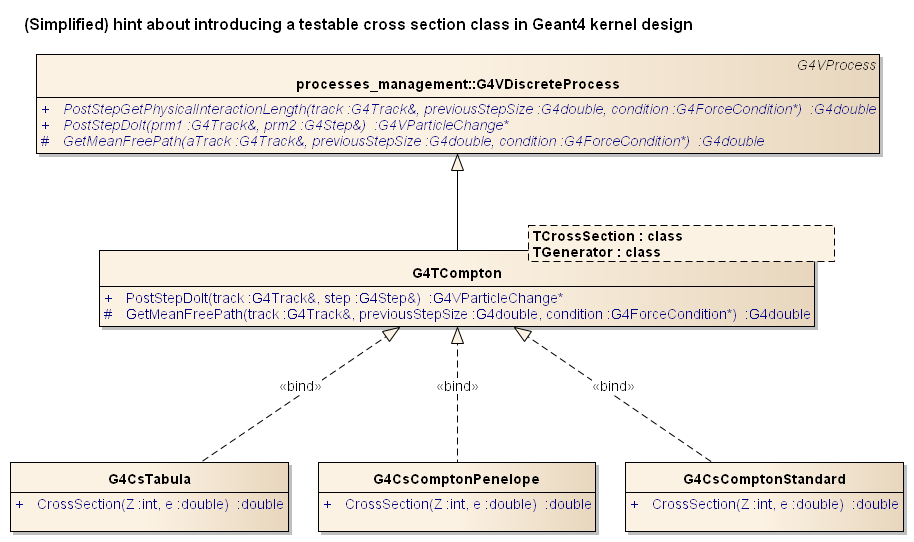
Hint: look at how a similar requirement (validating the Compton scattering cross section calculated in the Geant4 standard electromagnetic package) was dealt with by creating a G4CsComptonAPC class, placed in the source/processes/electromagnetic/pii/ package (header file and implementation). The "APC" class is a simplified version of the actual class that will be documented in the forthcoming publication. The (simplified) UML diagram below shows how it could fit into Geant4 kernel design:

pii-cs-policy.png

First try to do the refactoring yourself; then you may want to look at the solution below. While refactoring, proceed slowly, one step at a time: a little piece of code, compile, test, code, compile, test...
 
Solution: header file and implementation. It would profit from further refactoring!

Compiling new or modified classes

Place new classes in $G4INSTALL/source/processes/electromagnetic/pii/:
Whenever you add or modify a class in the pii package, recompile it:
The resulting library will be in $G4LIB/Linux-g++/libG4empii.a. Then build (or rebuild) the corresponding unit test as explained above.

Testing the new class

We create a test file to verify the correctness of the new G4CsPhotoelectricAPC class: let's place it in $APCDIR/PhotoelectricAPCTest.cc. You can find a hint about how to create a test here: this is a test for the similar Compton cross section class.

First try to create the test yourself; you can find a solution about how to create a test exercising the photoelectric cross section below.

Solution: test code.

Build and run the test as explained above:
cd $APCDIR/test
setenv TESTTARGET PhotoelectricAPCTest
gmake
$G4WORKDIR/bin/Linux-g++/PhotoelectricAPCTest

How do we verify that our implementation of G4CsPhotoelectricAPC is correct and equivalent to the cross section calculation in G4PEEffectFluoModel? We just realized that G4PEEffectFluoModelTest does not let us calculate cross sections. In this case we can resort to the same verification as the original authors of G4PEEffectFluoModel, G4SandiaTable and G4StaticSandiaData: we can compare a sample of calculated cross sections with the reference plots in the Sandia87-0070 report. For this verification we must compare cross sections calculated with "original" parameters, of course. Even if we use "improved" Aij parameters, we are able to do this verification, since for most elements the parameters are the same as the original (e.g. for Z=3,4,5).

This is only an approximate test, since we only have old PDF files with the original calculated cross sections. In a real-life verification test we would digitize some plots of the old report and we would automate the verification procedure. At the APC school our schedule is tight, therefore we shortcut this verification: some previously verified reference values are stored in here. The reference values in column 6 are obtained with original Aij parameters and in column 7 with improved parameters, respectively. In your test you should check that your G4CsPhotoelectricAPC class reproduces the same cross section values for the same test configuration of Z and photon energy (column 2 and 3 in the reference file, respectively). 

Adding functionality to the new class

We are curious to estimate how much the "improved" parameters actually improved the accuracy of the cross section calculation. Therefore we require the capability of calculating cross sections with original or improved Aij parameters. In G4PEEffectFluoModel this is not possible, since the parameters are hardcoded in G4StaticSandiaData.

Hint: store the parameters in external files and make the G4PhotoelectricAPC class load them when it is instantiated. For your convenience, files containing the two sets of original and "improved" Aij parameters are available in $APCDIR/parametersAPC/. You may pass an argument to the constructor of G4PhotoelectricAPC to decide whether to load the original or "improved" parameters.

Solution: header file and implementation.

You can use the reference values are stored in $APCDIR/data/all_photoelectricAPC.txt to test the modified class.

Comparison with experimental data

In $APCDIR/data/exp_photoelectricAPC.txt you can find a set of experimental total photoelectric cross sections. Each row corresponds to an experimental measurement. The data are structured in columns:
  1. Published reference identifier
  2. Z
  3. Energy (keV)
  4. Cross section (b)
  5. Cross section error (b)
The experimental data in $APCDIR/data/exp_photoelectricAPC.txt  concern two elements for which Aij parameters were improved: neon (Z=10) and argon (Z=18).

Now the G4PhotoelectricAPC class can calculate both original and improved cross sections. The test should calculate photoelectric cross sections corresponding to the experimental configurations. As a result, it should produce an output ASCII file, with each row containing:
  1. reference
  2. target Z
  3. photon energy (keV) 
  4. experimental cross section (b)
  5. experimental error (b)
  6. photoelectric cross section (b) calculated with the original Aij parameters
  7. photoelectric cross section (b) calculated with the "improved" Aij parameters
First try to create the test yourself; then you may want to have a look at the solution below.

Solution: test code and the resulting output file it produces.

How to plot the photoelectric cross sections with R

You can analyze the data with R. Since this is a simple analysis, we will use the no-frills basic R environment (no GUI, only R core packages, basic graphics etc.): you can do much more with a powerful system such as R!

You may want first to do some plots showing experimental and calculated photoelectric cross sections, then to estimate quantitatively the compatibility of the calculated cross sections with experimental data by means of goodness-of-fit tests, e.g. a chi-squared test. The R script $APCDIR/rwork/plotAPC.R produces two comparison plots, for Z=10 (neon) and Z=18 (argon), respectively.

Start R:
cd $APCDIR/rwork
R -g Tk &

In the R console click on the File menu on the top left corner, choose "Source R code" and select the plotAPC.R script.

The R script will load the file $APCDIR/dataAPC/all_photoelectricAPC.txt, will produce the plots in the R graphics window and will place a copy in PDF files in the same directory. If you want to plot the data you produced yourself instead of those in all_photoelectricAPC.txt, edit  plotAPC.R and replace /dataAPC/all_photoelectricAPC.txt with the appropriate file name and path from $APCDIR corresponding to your cross section data.

The result of the comparison will be shown at the end of the refactoring session at the APC school.

Homework

As homework, you may want to complete the exercise by modifying G4PEEffectFluoModel to use the new class. Then you should create a test to check the behaviour of the modified class.
You may have also realized that there are plenty of opportunities to practice refactoring with Geant4 code...


Last modified 19/6/2014 - © Maria Grazia Pia